How do I build a single IVR call flow that supports multiple languages?
⚡Quick answer -
Yes. You can use one call flow and add a Language node under your IVR Menu. Each DTMF key (1, 2, 3…) plays prompts in a different language, but all languages share the same underlying IVR logic, routing and reports.
WHEN SHOULD I USE THIS GUIDE?
Use this when:
- You want a single IVR that works in multiple languages (e.g., English, Hindi, and regional).
- Callers should hear all prompts (welcome, menu, after-hours, voicemail, etc.) in their preferred language.
- You don’t want to maintain separate IVRs for each language (less duplication, easier to manage).
1. PREREQUISITES
- Access / Role
- You are an Admin or any role that can open Call ▸ Design Callflow.
- Existing Call Flow
- At least one call flow has already been created (Basic or Advanced).
- Audio / TTS for every language
- For each prompt (Welcome, Menu, On-hold, Voicemail, etc.), you should have:
- Either system-generated audio (Text to Speech), or
- A recorded file uploaded to the Audio Library (supported format: MP3 for uploads).
- IVR design
- You are using Advanced Call Flow (multi-level IVR), where you can add nodes like Menu, Department, Custom Message, Voicemail, Language, etc.
Video walkthrough
2. STEP-BY-STEP SETUP – MULTI-LANGUAGE IN A SINGLE CALL FLOW
Step 1 – Open your call flow
- Log in to your MyOperator panel.
- Click Call on the left side of the panel.
- Go to Design Callflow.
- Either:
- Click Edit Live call flow, or
- Click Create new call flow and set up your base IVR.
Step 2 – Switch to Advanced Call Flow (if not already)
- In your call flow, click Create Advance Call Flow (or open the existing Advanced Call Flow).
- You’ll see nodes like Welcome, Menu, Department, Custom Message, Voicemail, Extension, Input & Response, etc.
Step 3 – Add a Language node under your Menu
- Locate the Menu node where you want callers to choose a language (e.g., after Welcome).
- Click the “+” icon in front of that Menu.
- From the node list, select Language.
- This node lets you add multiple languages in the same IVR.
Step 4 – Configure each language option
For each language you want to support:
- Click on the newly added Language node.
- In the properties pane (right side):
- Name – e.g., “English”, “Hindi”, “Tamil”.
- Prompt – greeting and language selection message:
- Use system-generated audio (TTS) and type your script in that language, or
- Select/upload a recorded MP3 from Audio Library.
- DTMF Key / Option – assign a number:
- e.g., 1 = English, 2 = Hindi, 3 = Tamil.
- Repeat for each language option you want.
- You can add up to 10 IVR options (0–9) as per the standard IVR limit.
Example prompt (TTS or recorded):
“For English, press 1. हिंदी के लिए 2 दबाएँ. For Tamil, press 3.”
Step 5 – Connect all language branches to ONE common IVR logic
- For each language option (1, 2, 3…), drag the outgoing arrow and connect it to the same downstream IVR tree, e.g.:
- Language (English) → Menu (Press 1 for Sales, 2 for Support)
- Language (Hindi) → Menu (Sales/Support Hindi prompts)
- You’re reusing the same routing structure (Departments, Voicemail, Time-based routes), but:
- The audio/TTS attached to each node should be in that language.
Tip:
- Keep node structure identical across languages; only change the audio or TTS text.
Step 6 – Set audio/tts in the right language for each node
For each language branch:
- Open Menu, Custom Message, Voicemail, etc. in that branch.
- For each node, set:
- Language-specific TTS script or
- Language-specific audio file from Audio Library.
- Save changes.
Step 7 – Preview & Publish
- Click Save to Preview.
- In the Preview section:
- Select your call flow (if multiple exist).
- Send a test call to your own number and test at least one path per language.
- Once verified, click Publish to activate the multi-language IVR.
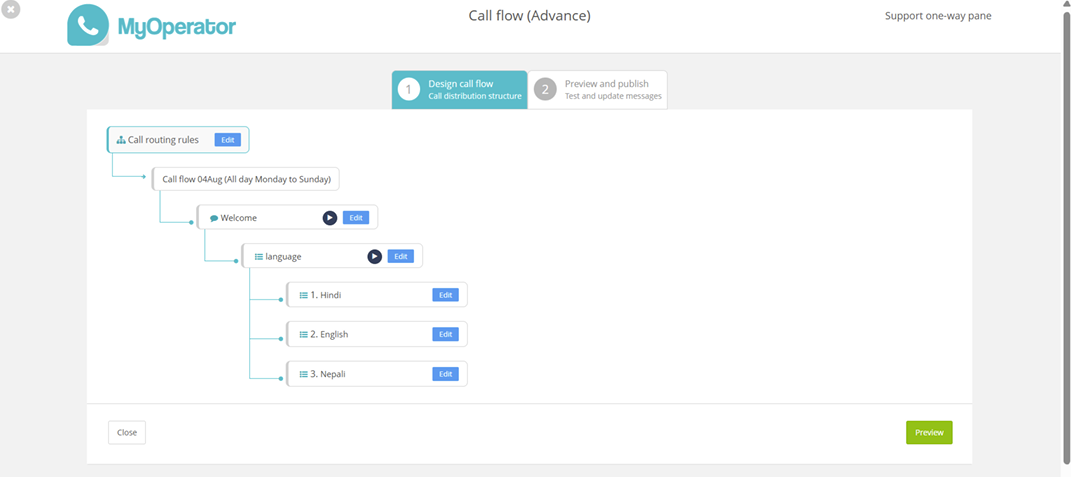
Alt text: IVR flow with multiple languages
3. EDGE CASES – WHEN THINGS DON’T BEHAVE AS EXPECTED
Scenario | What typically happens | Recommended fix / workaround |
Caller doesn’t press any key at language menu | Treated as no input / wrong input based on Advanced Settings. | Go to Call ▸ Design Callflow ▸ Advance setting → configure Menu Repeat and On wrong input to either repeat the language menu or transfer to a default language/agent. |
Caller presses an invalid key | Counted as wrong input for that Menu/Language node. | In Advance setting, set On wrong input to either repeat the language options or transfer to a fallback path (e.g. default language). |
You need more language options than DTMF keys | IVR has a practical limit of 10 keys (0–9). | Create a two-level language tree: first menu for region (North/South/International), second menu for actual language options. |
Only some prompts are translated | Caller may hear parts of IVR in one language and others in another. | Make a checklist of all nodes (Welcome, Menu, On hold, Voicemail, After-hours) per language and update via Audio Library. |
4. TROUBLESHOOTING MATRIX (MULTI-LANGUAGE SPECIFIC)
Symptom | What to check |
Call drops after language selection | - Route Settings (Advance setting → route change) - Check the call flow is published and timings are valid for this IVR. |
Language options don’t play / caller hears silence | - Open Audio Library → verify files exist and are mapped. - Ensure node has either TTS text or a valid audio file. |
Wrong language plays for a given key | - In Advanced Call Flow, confirm the DTMF mapping (1, 2, 3…) and arrow connections. - Check you didn’t reuse the wrong audio file. |
Language node not visible in the designer | - Ensure you are in Advanced Call Flow (not basic). - Click the “+” in front of Menu to see the Language node in the list. |
5. VERIFY & CONFIRM SUCCESS
- Dial your MyOperator number from a test phone.
- For each language option:
- Choose that language.
- Navigate the menu (Sales, Support, etc.).
- Check that:
- All prompts play in the selected language, and
- Calls still route to the correct departments/users.
- Test:
- No input and wrong input at the language menu to confirm behaviour matches your configuration (repeat vs transfer).
- Finally, monitor your Call Reports:
- Compare answer rates/abandonment/call duration after enabling multiple languages.
- If you’re using Node IDs, you can track usage of each language node more deeply via APIs.
6. NEXT STEPS / BEST PRACTICES
- Finalise production audio
- Once testing is done, get professional recordings (via Audio Library & voice artist request) for all languages.
- Use time-based IVR + languages
- Combine Time-based routes (office hours / after-hours) with language options so each time band also has language-specific prompts.
- Keep menus short
- Don’t overload callers: 3–5 language options are easier than 8–9.
- Review performance regularly
- Use call reports to see if a particular language has higher drop-offs; fix prompts or menu design accordingly.
Need help fast?
- Raise a ticket from your MyOperator panel, or
Call: +91 81029 81029for support.
Need help fast? Submit a support ticket or call +91 81029 81029.
Keywords: IVR, multi-language call flow, Language node, locale, DTMF, Text-to-Speech
Related Articles
What is the difference between a “Multi-Level” IVR and having “Multiple” IVRs and how to configure them in MyOperator?
⚡Quick answer - Multi-Level IVR = one IVR tree with nested menus under a single phone number. Multiple IVRs = several independent IVR flows, each tied to a different number, schedule, or campaign. Choose Multi-Level if you want layered navigation on ...Why is there a limitation on the maximum number of departments that can be added at a single level IVR?
⚡Quick answer: Single‑level IVRs use DTMF keypad input (phone digits). Usable options map to 1–9. Keys like 0, *, and # are often reserved (operator, repeat/confirm). More than nine menu choices create input conflicts and a poor caller experience. To ...How can I create an IVR/call flow with direct forwarding?
⚡Quick answer - Create or edit a call flow in the Call Flow Designer, choose No when asked about a menu (this disables IVR options), select your destination (single user, user group, or department), add optional voicemail or after-hours fallbacks, ...How do I view and change the working and non-working hours or days for a call flow in MyOperator?
Quick answer - You can view and update the working hours and days for any call flow directly from the Design Callflow section in your MyOperator panel. Go to Call → Design Callflow → Select your call flow → Edit → Adjust schedule (working hours, ...How do I set multiple call-availability time slots for a user in MyOperator?
⚡Quick answer: Yes. You can add multiple availability windows to a user so they only receive routed calls during those times. When should I use this guide? Use it when you need a single user to receive routed calls only during specific windows—e.g., ...